Showing posts with label lauras salvage design. Show all posts

Wednesday, December 31, 2014

Out with the old and in with the new-ish

Goodbye brown stripe.  I buy all my paint on the mistint shelf.  This can be a challenge.  I know my color wheel and am getting pretty dang good at tweaking the colors just so.  The blue/grey on the walls and the teal-grey-green on the cupboards are both "custom".  The savings are huge....but I'm learning it doesn't always work.  Although the recycled the cupboards were sanded the paint just isn't durable enough for the daily use. It didn't want to stick!  My dad always swore by the stuff he called "liquid sandpaper".  It just didn't work well for me this time.  I really needed his expertise.  But unfortunately he is getting too elderly to take to the worksite anymore.  I tried a clear a final clear coat,but in the long run I think I would go with a more durable enamel rather than painting 3-4 coats of a cheaper paint. whew.  Too much work!
These upper (left)  I created.  First attempt ever.  I learned my lesson with these quickly.  My large vintage square is my savior through out this whole job, but not lining shelves up was my mistake.   Although I wanted open shelving, it makes it impossible to put doors on in the future (because they didn't line up with each other.) Keep this in mind. 

New pony wall.  This should of been easy right?  It wasn't as solid as we wanted.  I didn't realis that that you have to frame in glass blocks so I bagged the staggered glass blocks  for the top.  I love glass blocks and I scored a bunch at Habitat for $2 ea.  I was bummed.  But I really like how the wood turned out on it.  I salvaged the tongue and groove from a 100 yr. old house on our farm.  I have wainscotting made with it around my adjoining dining room.  another possible issue is the fridge is pretty snug in it's original spot.  We just won't ever be able to buy a bigger fridge.  The flooring you can see (blue vinyl)  That is the original manufacturers flooring that was in when we purchased our snug little repo.  The "repo" experience was pretty good.  We have so many stories and are quite savy now......but we learned alot!  If anyone ever needs any advice about contracting your own Manufactured home placement or buying a Repo.....feel free to me here.We've been told to write a how-to.  I think we might do that here.


Tuesday, December 23, 2014

kitchen Re-Do

I hated my kitchen.  We had put in a new floor...again.  The cabinets were pressboard covered with a vinyl.  Standard issue for a manufactured home."Oh I can do that" I said to myself.  So I started collecting ingredients.  That's the way I approach most projects.  I scrounge and "score' before I buy it and sometimes takes a while.  My first find were cabinets from a 60's ranch house that were on Craigslist for $60.  The owner was taking them out to put in cabinets from Home Depot.  How is that and upgrade from Maple to pressboard?
These are the before photos.

left side - pantry door
right side - missing cupboard doors

Tuesday, December 16, 2014

why does this make me happy?

I took this photo at large antique show.  This guy was making a butt load of money.  Made me think it was time to sell my old hardware.  I snapped this photo with my iphone.  I'm not sure why, but I love this photo.  So ordinary....it must be the colors and the knowledge of what it feels like to dive in these and look through them.  They are all different.  Some sappy analogy here somewhere, but I won't go there.

I have really enjoyed my iphone camera.  It's a great camera. You've seen some here.  I have a few other places that I share my photos. Instagram and Foap are my favorites. You can buy them on my Foap account.  Click the links to see my galleries. 

Sunday, December 14, 2014

King sized continued....


If you have the desire to build things for your home you must invest in a nail gun and air compressor.  In this day of carpel tunnel and joint issues you might save yourself alot of pain and physical therapy charges.   I have gone through 2 - 18 gauge guns in my building lifetime (17 years ). My latest and favorite are these made by Porter Cable.  I got a great deal from Overstock.com on a Refurbished set.  The set had a 16 & 18 gauge nailers and a stapler.  I worked with a 18 gauge for years.  The 16 is the best for the actual building and the 18 is good for the final more delicate trim & etc.  This would be a good one......


Well, let finish up this project!  The above tongue and groove wood is what I came up with as ingredients. I wanted to use it because it would give interest in texture and pattern.  it's kinda special.  The bead board stuff came out of a family home that was de-constructed.  I've used it for a wall, and wainscotting.  This is the last of it. Although I don't have enough of either to just use one kind so I came up with this pattern. You could use any wood.  Mix it up.  Use wood that already has paint and make it colorful. Clear coat it with something.  I almost did that myself, but I didn't have time to "dilly dally".  It's freezing out and its time to get a headboard!  
It's easier to show you the photo of the tongue and groove wood laid out and then I can explain your best route of completion. I started by cutting the right and left sides with a random 1x4 that I had.  Cut to be flush with the top and bottom.  Glue and Nail ONE end only.  Then cut a board for the top edge.  When you get those 2 established (nailed) then you have a solid edge to butt up to get the decorative parts settled.  I needed to stretch out my tongue and groove boards so I created "spacers" with leftovers from the top and bottom boards.  I bought cheap pine 1x3's.....the rougher less pretty stuff from Lowe's.  The spacers then now are my template for "height" for the rest of the vertical boards.  Once you get your boards all cut - test them out.  I was in a hurry and didn't change my nail gun.  So I had some go through, but I figured the back side of the HB won't over be exposed so I just clipped them off.  Not always a good option.
You'll see in this close-up photo the small nail hole and some gaps that occurred.  All this type of thing can be filled with nail fill. ( Keep an eye out for an upcoming blog for "Hints and Tips" that I've learned and types of things I use. )


Get your ingredients all laid out before nailing.  This is spoken from experience.  I put the bottom on last to make sure all are forced up.  What I figured was that if there are any flaws I wanted them hidden behind pillows......so if you have a short board, make it short on the bottom side. 
Lastly I added the top ledge.  Below is a photo from above. From left to right : trim, plywood backing and then the top of the 2x4 leg.  All the boards are flush (even) on the top it was easy to cut a 1x4 to top it all off.  I added 1' hangover to each end.
top view showing layers of wood

Gluing that top board is important.
primer coat on the finished headboard
Most likely it will be lifted by that board so it needs to be strong!  Fill your holes and cracks.  I had one piece of bead board I put a line of caulk between as the gap was a little bigger and obvious.  I often will put one coat of paint on my creation before filling holes because you can see what fills up with paint and what can be ignored. Tomorrow's the final painting day.  I'll show you the results then.


Friday, November 14, 2014

Reuse Recycle.....be creative with what you have.

This is a hall tree I made 3 years ago.  It was one of the last doors I had salvaged.....Now people have figured out that they are amazing sources of wood and I have to buy them....


We went to the beach this summer and parked on a residential street around the corner from Mo's restaurant and found this.  First of all - I LOVE METAL! I even have a Pinterest board with fun metal reuse ideas.  I am big into reusing things for a new creation.  If you can't see...this is a fountain! ( I should of taken a video...dang it ) Super cool!  They also had a great fence made of this metal siding/roofing (seen on either side of the fountain.  I love it that people are getting original I'm so tired of houses painted taupe and looking all exactly the same.


This is a great fence.....Totally original.
Be original.....don't be taupe.


Friday, April 1, 2011

another rustic collage


Here I am again with another sculptural piece. It's Friday and I should be in the shower but I wanted to post quick before I'm off to the mountains.  This weekend I'll be providing a crafting experience to middle aged Mennonite women.  My good friend runs a wonderful woodland hideaway in the mountains near Lincoln City.  Drift Creek Camp is unique place and although a winding drive....I never pass up a chance to visit and see my friend.  And.....she makes wonderful espresso drinks!

This composition includes collaged vintage papers on a old box lid with it's original hardware remaining.  It's complimented with 2 contrasting carved walnut furniture adornments.  The sleek glass door knob is paired with the chippy green door handle base.  These are then mounted on a elevated remnant of a agricultural screen found here on the farm.  Created as a wall hanging.  All these elements contrast in texture and orgin.  Embracing many aspects of life. 

On a another note.  This upcoming July I'm attending a artist workshop "camp" all based around the use of hot wax...."Encaustics".  The camp was created to help all types of artist on how to incorporate encautics into your works of art.  I'm thinking that this piece would of been perfect to encase (the base) in wax.....I'm excited to be the host and student of this amazing combination of artists from around the U.S.  I'm happy to know that it will be held at my very own Western Mennonite School Campus so I don't have to travel far. You'll find info about it here....

Saturday, March 26, 2011

I've been trying something new...

Have you ever been to an art gallery and saw artwork you thought was ridiculous and wondered "what was that guy thinking?"....Well I guess that's the path I'm on. People are strange as to what they like.  I've always preferred collage.  I really dig assemblage and found object type creations .  Using items that would normally be tossed or using things for a different purpose seems to spark something in me.  Some people might not call it art, but it takes thought and time finding the right combination textures is intriguing to me. Here are a few reasons that I started in this new direction....1) I have the need to create...I needed to tap into that or I was going to go crazy.....2) I've acquired a lot of really cool hardware that I haven't found a need for with the furniture creations. 3) it's butt crack cold out side and my shop is not pleasant to work in. 4) I'm re-applying to a art show that I've done in years past and I wanted some new things to expand with.  The show called "Cracked Pots".  I was involved for a number of years but leadership has changed and I lost my connection with the gal who knew me. Reapplying is a drag but it keeps me on my toes and it ensures a high quality show.  I needed the time off.  Prepping for the show took weeks of work.  I overheard my daughter say "Mommy is in her shop again...."  I felt kind bad.  It was the tone of her voice and it sounded like I was in there too much.  That's when I decided to take a summer off.  We focused on having fun and one summer became two and now I'm back.  She's got her cousins to play with now and she's more independent.  Some days during the summer she's gone for hours playing....what a life.  This farm is such a treasure.  I wish I could of grown up here.  I had lots of outside fun though.  We lived in the hills outside Eugene.  Lots of fir trees to climb.  I had poison oak and pitch on me most of my life.   anyways.......I've been gone a bit from here too.  Now I'm back.  Here is a photo of one of my creations.  I'll post one photo a day.  Kinda funky stuff.......but it's fun.

Sunday, January 23, 2011

impatient

http://www.philipsperfectcolors.com/blog/wp-content/uploads/2009/09/paint-can-11.jpgI just realized the reason I can't stand staining wood is because of the waiting.  It always takes so stinkin' long to watch it dry......even in the sun! My dad likes stain.  He doen't like to cover up the "beautiful wood grain"...but I love color.  Paint is definately where it's at.  I was working on my website this weekend and when the professional (head sister Sheryl) asked for a color scheme. I was giddy!  who knew? I knew.....but it didn't occur to me I could have a scheme.....I just wanted it done!  I think I might be impatient.......like with the stain situation.......hmmm. Did you know you could look up "color schemes for websites" on the internet?  Yes you can....why you ask?  Well it is because you need a special "recipe" for the colors called hex #'s.  I've seen that before in my use of Photoshop, but knew it didn't concern me.  We cruised though a few and I picked one.  Just wanted to move on...  But then I realized I could look at them all......just like paint swatches!  I love paint swatches.  I remember as a kid looking at the brochures with the Glidden paint squares glued all in a row.    The reason I know it was Glidden as that was the paint my father used.  "It's the best......"  The guys down at the Eugene Glidden Paint Store knew him by name.  He was a teacher and a painter during the summer.  Ask me what TSP is and I know from working with my dad.  I too, am a painter.  I was amazed by the names.  "Sediment"...just a fancy name for brown, right?  I've always thought I'd be really good at coming up with the fanciful names.  It's all in the marketing.

Tuesday, January 18, 2011

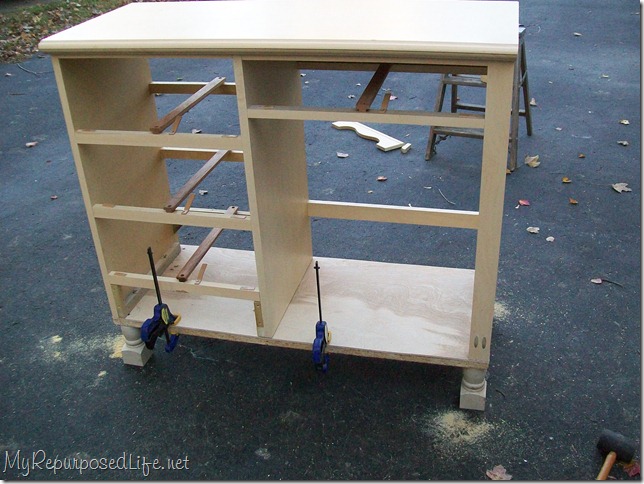
 The next project is a Kitchen Island.  I've been contemplating what style, size etc.Thus far I have option 1 with plans:  (link below photo) This plan is super but I'm too cheap to fork out for untreated cedar posts.  I just don't feel like using used for this.  It'll be around for a long time. I realize I could use 2 2by 4's but I'm thinking they'd be sketchy......and it'd show. 
http://ana-white.com/2010/03/plans-michaelas-kitchen-island.html

or Option 2


desk into island bar http://myrepurposedlife.blogspot.com/2010/11/diy-kitchen-island.html

this option is to start with a dresser or similar and alter to the needs of the cook..... this is a great idea.  Totally got this idea from this gal's blog.  But she is there to share and motivate......ding....light bulb went on. I don't have a dresser in mind.  So the hunt goes on.  I do like this idea though. 
One important factor is that the husband needs to be able to pull up his stool and eat there.  Drop leaf would be good idea.  I'll keep searching.

Wednesday, January 5, 2011

a little bummed that there's no snow....

Well, the rain has started again!  I was secretly hoping for a big snow storm that would take us by surprise!  No luck.  At least it's not 20 degrees.  I will have to get into my shop this evening after school.  In the mean time I'm planning my next "Knock-off Wood" creation...I wanted to show what you can do if you have a husband that saves trinkets and treasures.  Everything is very cool.  Ticket stubs, matchbooks, Mr. Peanut, guitar pics, Old pens, receipts (from his first Mac-Intosh Computer), old tins, baby books, poker chips, business cards, coasters, patches, lipton tea ceramics, doodles from church.....the list goes on.  I just realized i was finding all these little "treasures" and they didn't have a home.  I'd ask him what it was and he'd tell me that it was from his grandma or it was something he dug up on the farm when he was a kid or it was from aunt Alice or......  Now I totally understand about keeping this type of stuff.  I to have a secret collection myself. But I decided to finally starting a collection together in one box.  When the box was full and I had the perfect frame....these shrines were born.  Theses frames are from IKEA and were very affordable.  Actually should of gotten a few more.  Establishing a background is a important first step when creating a collage / assemblage.  I used photo copies of a few photos and some flat items (like coasters, ticket stubs, or doodles) a craft paper grocery bag and some snippets of note/letters that he wrote to me over the years.  The pair on the right are only 12"x12" and include more miniture type objects.  I created the larger version with more of a photo / flat type item theme.  I attended a crafty girls weekend up at Driftcreek Camp on the Oregon Coast Range.  while the other ladies were scrap booking or quilting..my sister and I arranged, rearranged and then arranged again to get all the ingredients just perfect.  We used hot glue to adhere them.  The photo above was very difficult to acquire with out reflections...so sorry.  But for now you can at least get an idea.  Gotta run and get off to my real job......Art Teacher.  How many days til summer break?

Sunday, January 2, 2011

doors again

I started thinking about how I've used doors and found this photo.  The photo is a bit slanty, sorry.  It's a hall tree.  The legs were purchased on ebay from back east and originally from an old kitchen table.  The top flips up for hidden storage and I added hooks for keys and a vintage garden tool for decoration.  The door was unusually narrow so it wasn't too heavy.  Weight can be an issue. Once I get all the top quality ingredient together sometime the creation ends up weighing a ton! I hated to see this one go.....but I've learned you can't keep every project.  I often wonder how Ana White finds a place for all the things she builds....I'm betting her friends and family get a rotation.  I should of kept this one.  

Another one of my favorites is this bench.  It has a door frame as part of the back.  I will be making another like this soon as I scored the cedar fence boards this week.  All I need now is to finish my current project, but it's been so stinkin' cold. 

Thursday, December 30, 2010

it started with the doors

This is the favorite bench.  I really wish I had a better photo of it though. Made with 2x6 scrap legs, half of an old solid door and lovely corbels. I finished it off with a carved embellishment on top.  It was majestic!  A throne.  Made by the Queen....ha,ha. I got started creating as "laura's salvage design" because of doors and corbels.  I was flabergasted (sp?)when beautiful doors were removed from old house when being remodeled and replaced with new ones.....Like new doors were better?  How could they possibly be made with a higher level of craftsmanship or better ingredients?  Old growth wood and actual steel & cast iron hardware isn't good enough?  It's laughable.  I had salvaged all these doors to "do" something with....so I started there.  I just wish I documented it better.  I am learning that i need to consistently take photos....The issue lays with quantity.

The church steeple bird house (on the majestic bench above)is still in my collection.  It was made to be on a column stand. I couldn't part with it.  Here are more that I created for a friends mom....some ask if I am doing my research for correct hole diameter for birds.  Bird experts frown when I tell them I wasn't concerned about it.... In my head I'm saying......"oh geez!...birds don't care.....they'll make their nest in a crack of a tree.  They don't measure and ponder their other rental options." But I refrain....  I don't mention that most often it's the yellow jackets that move in first.

Tuesday, December 28, 2010

vintage is best

I love this photo.  I acquired it in Northern Indiana at an Amish Auction house about 7 years ago.  I bought a suitcase of old photos and then sold most of them on ebay when I got home to pay for the rest of the stuff we bought that day.  Kinda kicking myself now that these type of photos are so sought after.  Should of scanned them and sold the copies.  Oh well.  This photo speaks to me though.  I do sometimes wonder who it is.  The history of that day is lost forever.  It's sad to me to think of that loss.  That sadness is similar to the feeling I have when I see a old home being torn down.  Seeing that big pile of wood ready to be burned.....Or when a home is neglected and it's rotting away.  Giving wood that has been salvaged a second life is inspiring.  Creating new heirlooms with that wood gives it a new history.  People love to know the history of the wood I create with.  I salvaged from a big red barn down the road one year.  Relaying the history of the barn and that it was still being used as a barn was like candy to the customers that bought the items.  It also gives them a connection to a life they've never appreciated or experienced.